
Your Rustic Rooster Craft Kit Guide
Everything you need to feel confident, prepared, and ready to create something you're going to love.
Whether you're brand new to crafting or you've been creating for years, we're here to make your Rustic Rooster experience easy, relaxing, and fun.

Before You Begin
Let's Make This Easy
Crafting should be relaxing—not intimidating. Before you grab your paintbrush, take a few minutes to get familiar with your kit and prepare your workspace. A little preparation will make the rest of your project easier and more enjoyable.

-
Unpack Your Kit
Lay out all your pieces so you can see what you're working with. -
Protect Your Workspace
A little newspaper, cardboard, or a craft mat makes cleanup much easier. -
Gather Your Supplies
Have your paint, brushes or sponges, glue, and anything else you'll need nearby. -
Take Your Time
There is no prize for finishing first. Let your paint dry between layers and enjoy the process.
What You'll Need
Included in Your Kit:
Your Pre-Cut Wood Pieces
🪵 laser-cut wood pieces to create the project shown in your kit listing
simple project instructions to help guide you from start to finish

You'll Provide:
Basic Craft Supplies
🎨 Paint
🖌️ Paintbrushes or makeup-style sponges
🧴 Wood glue
🧻 Paper towels
📰 Something to protect your workspace
Don't have everything on hand?
No worries.
You don't need a fancy craft room to get started.
Optional Extras:
Make It Your Own
✨ Paint markers
🎀 Ribbon
🪵 Wood beads
✨ Embellishments
🎨 Stencils or scrapbook paper
✨Your favorite finishing touches
These are completely optional.
Your project is yours to customize!
Painting Tips
There's no one right way to paint your project. These simple tips will help you get started, but remember: your project doesn't have to look exactly like ours. It's yours to create.
Less Is More
🎨
It's easier to add more paint than to take it away. Start with a lighter layer and let it dry before adding another.
Start With Thin Layers
Don't Chase Perfect
🖌️
Paint doesn't have to stay perfectly inside every line. Small imperfections are part of what makes handmade projects special.
A Little Mess Is Okay
Try a Sponge
🧽
A small makeup sponge can make painting larger areas quick and easy. Use a light touch and build the color gradually.
Brushes work beautifully for smaller details and edges.
Sponges Are Your Friend
Let It Dry
Give each layer time to dry before adding another color or assembling your pieces. Rushing this step can lead to smudges, fingerprints, or unwanted paint transfer.
Need to speed things up? A hair dryer on a cool or low setting can help. Keep it a little distance from your project so you don't disturb wet paint or loose pieces.

Patience Pays Off
✨ Your project doesn't have to match ours. ✨
Our finished project is simply inspiration.
Change the colors, add details, try something different, or keep it simple.
Make it yours.

Layered by Design
We designed our kits to make assembly easier.
Many Rustic Rooster projects are built in layers, so you don't have to worry about perfectly painting around every little detail. The pieces are designed to stack together, creating depth and dimension while making the finished project look polished and professional.
Layered for Ease
Because many of our designs are layered, you don't have to worry about staying perfectly inside every little shape. Paint your individual pieces, let them dry, and let the layers do the work.
Paint Without the Pressure

Your Pieces Tell You Where to Go
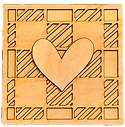
Look for the Etched Guide Lines
When a piece is designed to sit on top of another, we've etched a light outline onto the piece underneath to show you exactly where it belongs. Simply line up your painted piece with the etched guide and glue.
The guide line is intentionally subtle. Once your piece is in place, you shouldn't see the etched outline because the top piece is just slightly larger.


Layer by Layer
Build Your Design
Some projects have multiple layers. If another piece goes on top of the first layer, you'll find another etched guide line showing you exactly where that next piece belongs. Just follow the guide lines from the bottom layer up.
Each layer adds depth and dimension, helping your finished project look more detailed, polished, and professional.
Then Let It Set
A Little Glue + A Little Patience
Once your pieces are lined up, use a small amount of wood glue to secure them. Allow the glue to dry completely before moving or displaying your project.


✨ Designed With You in Mind ✨
We believe crafting should be about creativity—not frustration. Our layered designs and built-in placement guide lines are intentionally created to make projects easier to paint, assemble, and enjoy, whether you're brand new to crafting or simply want a more relaxed creative experience.
You don't have to have a perfectly steady hand.
You don't have to be an expert.
And you definitely don't have to get anything perfect.